English    |    Français

SPARKvue is now completely free as a browser-based application!

We’re excited to announce SPARKvue is now available free of charge on all your devices as a browser-based application.

This new version of our software as a Progressive Web Application (PWA) means you have free access to all the features of SPARKvue from Google Chrome and Microsoft Edge browsers. That’s right: No download fees, subscription fees, or update fees, even for Windows® and Mac®. Plus, the app is always updated to the latest version automatically, so you never have to worry about it.

Access SPARKvue from your Google Chrome and Microsoft Edge browser from any device–online or offline–and start collecting data with three simple steps:

  1. Open Browser
  2. Download SPARKvue
  3. Connect PASCO Sensors

Try SPARKvue in your browser today!

Watch the video below to get started:

SPARKvue (PWA) is designed for use on laptops, computers, and Chromebooks. To download SPARKvue for your iPhone or iPad, download the free SPARKvue app on the App Store. For Android devices, get SPARKvue on Google Play. Skip to the article section, Free Apps for Android and iOS Devices, for links to download SPARKvue to your mobile device.


System Requirements

Windows
  • Windows 10 or later
  • Processor: Intel i3 1st Gen (or equivalent) or later
  • RAM: 4GB or greater
  • Disk Space: 349 MB
  • Resolution: 1024 x 768 or higher
Mac
  • Mac OS v 10.14 or later
  • Processor: Intel i3 1st Gen (or equivalent) or later, or Apple M1 (using Rosetta 2)
  • RAM: 2 GB or greater
  • Disk Space: 504 MB
  • Resolution: 1024 x 768 or higher
Chromebook
  • It is recommended to be on the latest OS the machine supports
iOS
  • iOS v13 or later. Compatible with iPhone, iPad, and iPod touch.
Android
  • Android v7.1 or later. Compatible with tablets or phones.

Free Apps for Chromebook, Android, and iOS Devices

These free SPARKvue apps provide the complete software install so that the user experience is the same regardless of platform. Updates for these apps are handled via direct notification and installation on your device, including SPARK LX/LXi users.

Chromebook Devices

Get SPARKvue for Chrome OS devices in the Chrome Web Store.

Chrome Web Store

Android Devices

Get SPARKvue for Android based phones & tablets on Google Play.

Google Play Store

iOS Devices

Get SPARKvue for Apple iPhones & iPads in the App Store.

Apple App Store

Sideloading on Android

Android users who do not have access to Google Play may optionally sideload the application by downloading the SPARKvue APK and following this Knowledge Base article. This includes updating SPARKvue on PASCO’s SPARK LXi/LX Dataloggers.

Need the 64-bit installers for Windows and Mac for a local installation? Click here.

In-app Updates for Windows® and Mac® Computers

Existing users of SPARKvue on Windows and Mac computers may update to the latest version using the in-app update feature. Simply launch the SPARKvue application and choose “Check for Updates” from the file menu to get started.

How does the PASCO Smart Cart Compare to the Vernier Go Direct® Sensor Cart?

Smart Cart Comparison Banner

How does the PASCO Smart Cart Compare to the Vernier Go Direct® Sensor Cart?

The Smart Cart may appear to be equivalent to competitors like Vernier’s Go Direct Sensor Cart–they include many of the same features and specifications–but several distinctions set the PASCO Smart Cart apart.

What’s the Same?

Both Measure:

  • Position
  • Velocity
  • Acceleration
  • Force

Both Feature:

  • Wireless software connection
  • Use on or off a track
  • Plunger

Both Include:

  • USB Cable
  • Rubber Bumper
  • Hook

What’s Different?

PASCO Includes More

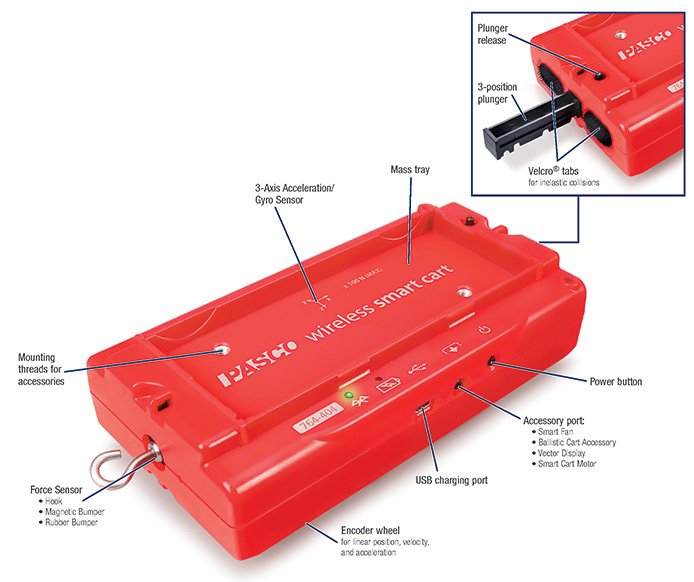
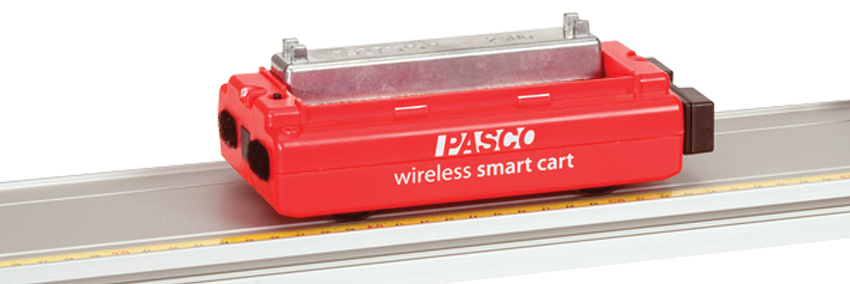
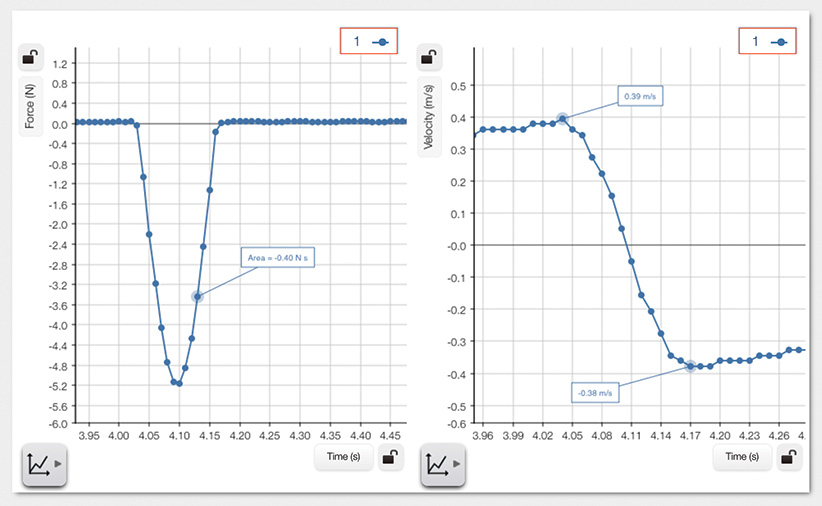
The PASCO Smart Cart comes with both hook and loop and magnetic bumpers. The magnetic bumper attaches to the force sensor, enabling you to measure the impulse during a collision. You must order bumpers separately for the Vernier sensor cart.

Smart Cart Callout

Why?

PASCO’s design makes it easy to launch the cart at 1x, 2x, and 3x velocities. With F, 2F, and 3F settings built-in to the Smart Cart, students can spend more time gathering data and solving for unknown variables and less time fiddling with cart settings.

This is important because you want to do more collisions, and with included bumpers, you can. Use the hook and loop tabs for inelastic collisions, magnetic bumper for elastic collisions, or unscrew the magnet and replace it with the rubber bumper for harder impacts.


Simple to Use Plunger

The Smart Cart plunger easily clicks into 3 different settings that correlate proportionally to 1, 2, and 3 units of force. By simply pressing the plunger to your desired setting, you can easily launch the Smart Cart at three different velocities that correlate to 1F, 2F, or 3F. Vernier’s plunger does not click into distinct velocity settings. What’s more, the total range of force on the Vernier cart is smaller than the range available to the Smart Cart, as you can only increase the force on the Vernier cart up to 1.3x.

Why?

PASCO’s design makes it easy to launch the cart at 1x, 2x, and 3x velocities. With F, 2F, and 3F settings built-in to the Smart Cart, students can spend more time gathering data and solving for unknown variables and less time fiddling with cart settings.

Larger Load Cell Capacity

PASCO’s Smart Cart load cell capacity is ±100N, double that of Vernier’s cart which is ±50N.

Why?

A larger load cell capacity means students are less likely to damage the sensor. Measure larger impulses and create collisions with higher impact. Since the sensor can withstand 100N, it is less likely to break during a tug-of-war demonstration of Newton’s 3rd Law.

Smart Cart Rubber Band Experiment

Sealed & Protected Encoder Wheel

PASCO’s encoder wheel is internal and connects to the axle of an existing wheel. Vernier’s encoder wheel is an exposed 5th wheel on the underside of their Sensor Cart.

Why?

A built-in optical encoder wheel means it is sealed and protected from everyday student use. It won’t fall victim to dust, grime, or student abuse, ensuring your data is as accurate as possible for kinematics studies.

Higher Encoder Sampling Rate

PASCO’s Smart Cart encoder maximum sampling rate is 500Hz. Vernier’s rate is 30Hz.

Why?

A higher sampling rate means you can collect more data points! This is important to match a higher sampling rate of the force sensor during impulse experiments.

Smart Cart Magnetic Collision

PASCO Doesn’t Manipulate the Data!

Vernier’s software performs data smoothing automatically so it cannot be turned off completely.

Why?

You’re a science educator who wants your students to collect and graph the real data, so that’s what we give you.

3-Axis Gyro

PASCO’s 3-axis accelerometer includes a 3-axis gyro, and Vernier’s 3-axis accelerometer does not.

Why?

The gyro allows you to measure angular velocity right out of the box so you can study centripetal force.

EX-5551 Graph

No Bumper Assembly Required

No classroom management or assembly is required to ensure the magnetic bumper is the correct orientation (north and south poles) for the Smart Cart. For the Vernier cart, you must assemble all magnetic and velcro bumpers separately, and make sure the four pieces for each Vernier cart are accounted for.

Smart Cart with Mass

Why?

Fewer pieces and minimal assembly means easier setup, easier cleanup, and less items to lose–giving you more time for investigations.


Bluetooth Time Sync Within & Between Carts

We’ve engineered our Smart Carts to time-synchronize all on-board sensors; In other words, force data syncs with velocity data from the encoder. Further, data also syncs between multiple carts in a collision so the data from both carts lines up. Vernier’s data is out of sync, and synchronization worsens as sampling rate increases.

Why?

Dependable time sync between carts means your data and graphs correlate with the phenomenon, making it easy for your students to interpret what their data is showing.

Proportional Smart Cart Masses

The Smart Cart and masses are proportional and stackable; the Smart Cart is 250 grams and the cart masses are each 250 grams. Vernier’s cart is 286 grams and the masses are 125 grams which creates strange multiples of total mass as you add masses.

        Why?

Stackable and proportional masses create conceptual demonstrations and easier numbers to work into equations, aiding students in understanding core concepts.

Force Velocity Graph

More Accessories Available

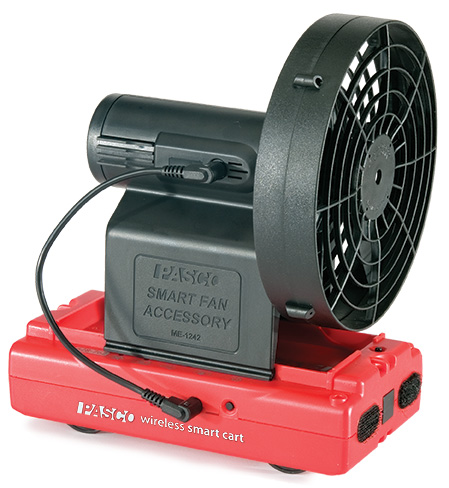
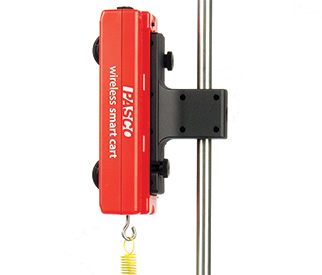
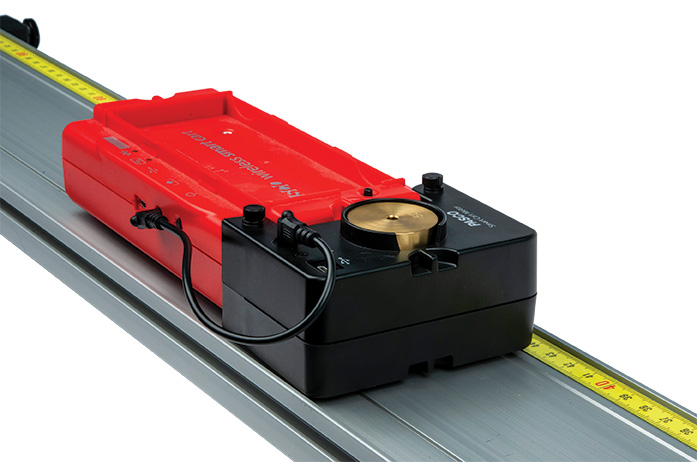
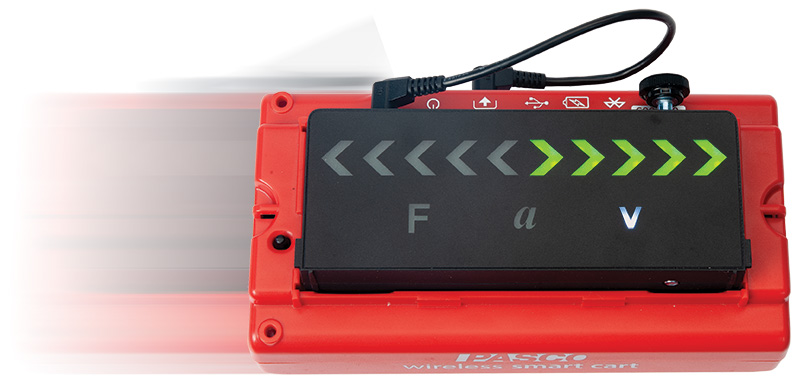
PASCO has several add-ons that pair seamlessly with our Smart Cart’s design, including a Smart Fan, Smart Ballistic Accessory, Rod Clamp, Vector Display, and Motor. Vernier does not offer any of these accessories.

Smart Cart with Fan

ME-1244 in use


Why?

Do more physics! PASCO’s accessories are designed to easily attach to the Smart Cart so students can examine core physics concepts. Also, when you connect a Smart Accessory to the Smart Cart, the Smart Cart can control the accessory for customizable investigations!


Smart Cart Front Track

ME-1246 View from Top


With an unparalleled design and countless applications in the physics lab, the PASCO Smart Cart will undoubtedly become one of your favorite teaching tools!

Back to School Resources for Fall ’23

Fire up that printer! Charge those devices! Brew that coffee! It’s back to school season everyone, and we’re sharing our top eight tech tips and resources to help you prep like a pro.

Most PASCO sensors and interfaces don’t require any maintenance, but a quick tune-up before school starts can help prevent surprises during class time.

Relevant Resources
Knowledge Base: Updating Firmware for Wireless Sensors and Interfaces
Video: Update the Firmware on a Wireless Sensor (Capstone)
Video: Pre-lab Prep for Chromebooks (SPARKvue)


Skip the chaos of in-class software updates by making sure your class devices are running the latest versions of SPARKvue (v4.9.1) or PASCO Capstone™ (v4.6.1) software prior to starting a lab.

SPARKvue
PASCO Capstone™


Whether you use laptops, Chromebooks, or desktop computers, updating to the latest Bluetooth driver helps ensure your PASCO sensors connect reliably to classroom devices.

Relevant Resources
Knowledge Base: Wireless Sensors not Detected on Windows with PS-3500 Adapter
Video: How to Determine the Bluetooth Version of My PASCO Device
Knowledge Base: How Do I Troubleshoot Connecting a Wireless Sensor?

Check that the sensors you’ll be using this year are in working condition. Replacement parts and consumables, such as electrodes and carbon paper, can be ordered through our website or by calling us at 877-967-2726.

Replacement parts and consumables are listed on the Buying Guide tab of their respective product pages. They can also be found by using the search bar at the top of the website.

Common Consumables Replacement Parts
Coin Cell Battery Pack pH Electrode
Carbon Paper Soaker Bottle Replacement pH/ISE (5 Pack)
Field Mapper Kit Replacement Cart Axles
pH Storage Solution Replacement Jumper Clips (Modular Circuits)


Video Library

From full product guides to bite-size how-tos, the Video Library hosts a variety of media to help you maximize your PASCO solutions.

Software Help Guides

Bookmark these handy software guides for quick access to answers during class time. Each guide is fully searchable, making it easy to find step-by-step solutions for most software questions.

Knowledge Base

The Knowledge Base is a treasure trove of resources for your most specific product questions. It’s consistently updated by our Technical Support team and includes answers to all types of FAQs—both new and old!

PASCO Technical Support

When you need personalized, step-by-step guidance, reach out to Technical Support. Our friendly team members are here to help via chat, email, or phone call during business hours.

Wireless Sensors are Now Stocked in Oakville!

Here are just a few of the products currently available! If you need something quickly, please give us a call @ 877-967-2726. We can ship across Canada for delivery within a few days for all Canadian stocked items.

Also in-stock & on sale!!

Many of PASCO’s wireless sensors are now stocked in Oakville, Ontario.

Smart Carts
Red: ME-1240
Blue: ME-1241

Wireless pH Sensor
PS-3204

Wireless Light Sensor
PS-3213

Wireless Temperature Sensor
PS-3201

Wireless Sound Sensor
PS-3227

Wireless EKG Sensor
PS-3236

Wireless Spirometer
PS-3234

Wireless Force Sensor
PS-3202

Wireless Soil Moisture Sensor
PS-3228

Airlink
PS-3200

Wireless Acceleration Sensor
PS-3223

Wireless Colorimeter
PS-3215

Wireless Pressure Sensor
PS-3203

Wireless Rotary Motion Sensor
PS-3220

Wireless Temperature Link
PS-3222

Wireless Conductivity Sensor
PS-3210


Physics in Soccer: World Cup 2022

The 2022 World Cup has officially begun, and there’s never been a better time to explore the physics of soccer (or in Europe, football) with your students! From predicting the outcome of a crossbar challenge to understanding the science behind Ronaldo’s famous knuckleball free kick, physics plays an important role in determining which team rules the pitch.

Throughout the World Cup, we’ll be sharing soccer-themed content to help you bring the excitement of the World Cup into your physics course. In our first segment, we’ll explore the physics of soccer’s most infamous pre-match event: the crossbar challenge.

The Physics of Soccer: Crossbar Challenge

The crossbar challenge is a popular pre-game competition held between players from opposing teams. To compete, players take turns kicking soccer balls into the crossbar of a goal. The player who hits the crossbar the most wins the crossbar challenge. Seems simple enough, right? Well, not exactly!

In reality, the crossbar challenge is, well, challenging. The average player is lucky to land two of their five shots, which makes the five-for-five performances of superstars like Neymar Jr. all the more impressive. In fact, Neymar’s success in crossbar challenges is so repeatable that it begs the question: what is Neymar doing that other soccer players aren’t? (Check out this video to see Neymar demonstrate his technique in a crossbar challenge against two other professional soccer players.)

As it turns out, there is a secret to Neymar’s success: physics! When a player kicks a soccer ball, its landing position is largely determined by both the aerodynamics of the ball and the angle, direction, and velocity of the player’s kick. If we ignore aerodynamics for a moment (more on that later), then the crossbar challenge becomes a real-world example of projectile motion.

Incorporate the World Cup into your physics course with these soccer-themed projectile motion problems! Download the student worksheet for free below.

Celebrate the World Cup with these Soccer-Themed Practice Problems!

Download the free Physics in Soccer student handout and answer key below.


1. While warming up for a match at the World Cup, Neymar challenges Aleksandar Mitrović to a crossbar challenge. Both players must take their shot 11 meters away from the goal, but the angle and speed of their kicks can vary. The crossbar is 2.4 meters above the ground. Assuming air resistance is negligible, answer the following questions:

a. If Neymar kicks the ball at a 40° angle, and it takes .87 seconds to hit the crossbar, what must the initial speed of the ball be?

b. Mitrović launches the ball at a 41° angle with a velocity of 18.4 m/s. It flies through the air, passing 1 meter above the crossbar. How long is the ball in the air?

c. Challenge Question: The next round, Mitrović kicks the ball with an initial velocity of 21.0 m/s. Determine the minimum and maximum kicking angles required for the ball to make contact with the crossbar.


2. During a World Cup match, Lionel Messi kicks the ball at a 45° angle from ground level. It reaches a maximum height of 3.2 meters and lands 22.7 meters down the pitch. Assuming air resistance is negligible, answer the following questions:

a. What is the initial vertical velocity of the ball?

b. How long does it take for the soccer ball to reach the ground?

c. What is the initial horizontal velocity of the ball?


3. When the soccer ball leaves the field during a match, a corner kick is performed to restart the game. To perform a successful corner kick, the player must kick the ball at just the right angle, so that it bypasses opponents and lands near teammates. During a practice session for the World Cup, Cristiano Ronaldo makes a corner kick at a 42° angle, launching the soccer ball with an initial velocity of 26 m/s. Assuming the ball travels with projectile motion and air resistance is negligible, answer the following questions:

a. At what time does the soccer ball reach its peak height?
b. What is the maximum height reached by the soccer ball?


4. While practicing for the World Cup, Kylian Mbappé kicks the ball from the ground at a 41° angle. As the ball launches with an initial speed of 28.5 m/s, an opponent 54 meters away at the opposite side of the soccer field begins running to get the ball. What is the average speed he must maintain in order to make contact with the ball just before it hits the ground?


File Attachments

Physics in Soccer: Projectile Motion Problems – Student V File Size: 81.32 KB
Physics in Soccer: Projectile Motion Problems – Editable File Size: 37.64 KB
Physics in Soccer: Projectile Motion Problems – Answer Key File Size: 55.11 KB

Working with TecQuipment’s Wind Turbine Dynamics Apparatus

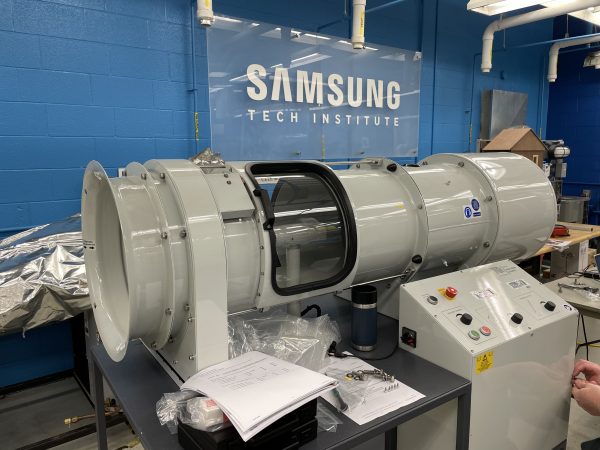
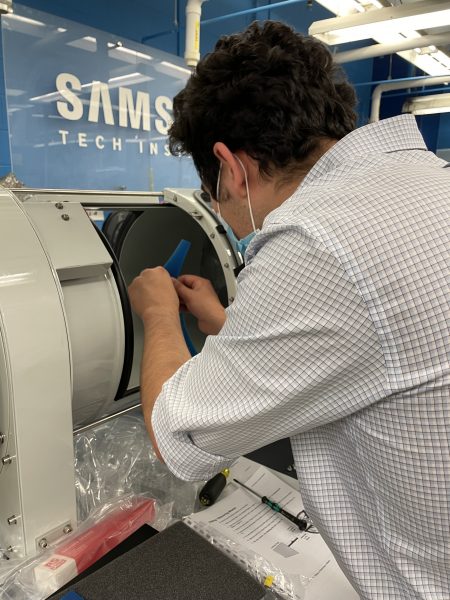
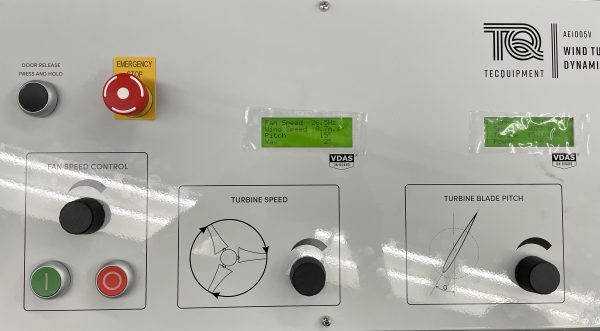
Last Friday, I was given the opportunity to take a trip to Centennial College alongside a colleague of mine to help a group of professors with the assembly of the TecQuipment AE1005V Wind Turbine Dynamics Apparatus. The apparatus is comprised of a bell shaped mouth and honeycomb to reduce turbulent airflow, a silencer to reduce excessive noise, an anemometer to record wind speed, and a digital display for pitch, yaw, fan speed, and turbine speed, all of which are adjustable. We arrived at the campus early in the morning, where we met with our contact at the school. He led us through the college into the machine shop and we began to assemble the AE1005V.

The assembly process was very simple and easy to follow from the provided instructions. Once the silencer is removed from its stowed position and fastened to the back of the apparatus, we connected the Control Cabinet to a power supply and opened the sliding door to attach the fins to the turbine. We then connected the apparatus to a laptop which was running the Versatile Data Acquisition System, or VDAS, which automatically collects data, calculates experiment parameters, and allows the user to create graphs and tables for the collected data. Once the fins were secured and the security door was closed and locked, we began to experiment with the fan speed, pitch, turbine speed, and anemometer. This data was also digitally displayed on the Control Cabinet.

Now that the apparatus was fully set up, we began to work through the first experiment to determine the influence of pitch angles and turbine speed on the coefficient of performance and power generated. As a future environmental engineer hoping to specialize in air hydrology, I was really grateful to be able to have a hands on experience with this kind of equipment. The option to switch out the included turbine fins for ones that have been 3D printed by students made the AE1005V even more interesting to use, with students being able to create and test different fin designs to determine optimal performance, and this really piqued my interest.

Eventually, I would like to spend more time using and learning about the AE1005V Wind Turbine Dynamics Apparatus, and other technology like it, and I am grateful that I had the opportunity to speak with the professors about what they plan to use theirs for throughout the upcoming fall semester.

PASCO’s Python Library

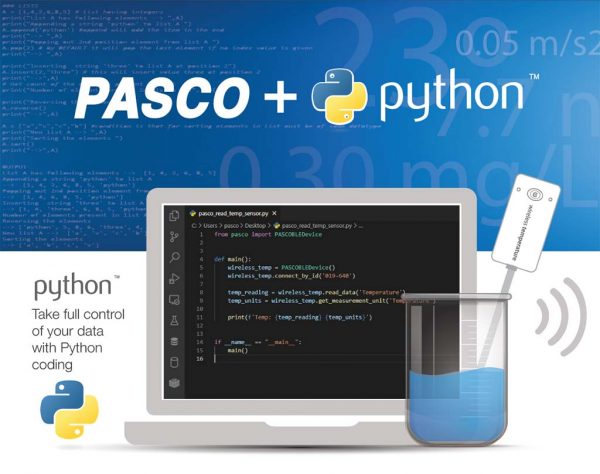
The PASCO Python Library lets learners, educators, and hobbyists take full control of their PASCO Wireless Sensors using Python code. Visit us on GitHub to download the PASCO Python API, browse sample code, and review tips for getting started.

Why Python?

  • Python is used in schools and universities around the world.
  • It’s simple, readable, and flexible, making it ideal for both beginners and experts.
  • Python resources are readily accessible thanks to its global community of creators, collaborators, and problem-solvers.

Python vs. Blockly

Blockly is an easy-to-use, block-based programming platform available in both SPARKvue and PASCO Capstone. Unlike Blockly, Python is a text-based programming language that is independent from PASCO software. This library lets you bring Python into the PASCO ecosystem for complete control of your data. With Python, users control all aspects of sensor data collection, from sensor connections and sampling rates to data displays and custom analytics.

Visit us on GitHub to view instructions for getting started and browse sample code for Python projects.

Compatible Sensors

  • //code.Node
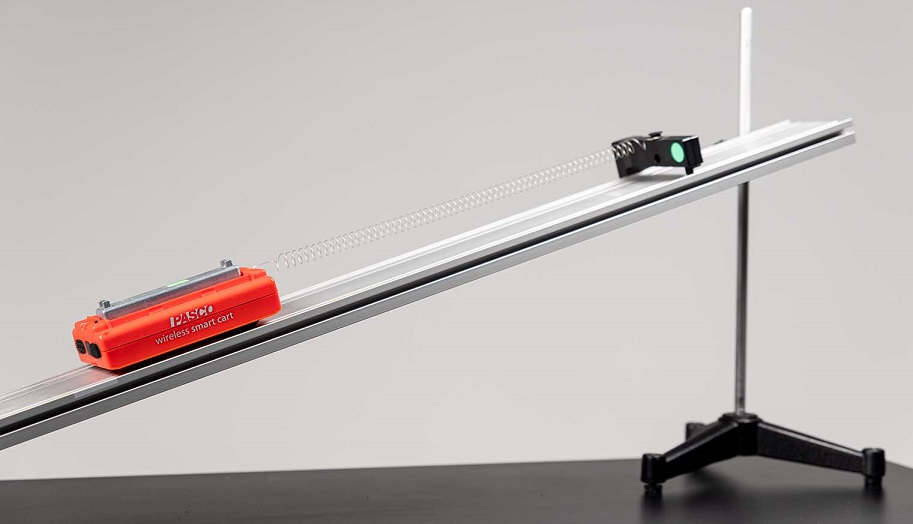
  • Smart Cart
  • Wireless Acceleration Altimter
  • Wireless CO2
  • Wireless Conductivity
  • Wireless Current
  • Wireless Diffraction
  • Wireless Drop Counter
  • Wireless Force Acceleration
  • Wireless Light
  • Wireless Load Cell
  • Wireless Magnetic Field
  • Wireless Motion
  • Wireless O2
  • Wireless Optical Dissolved Oxygen
  • Wireless pH
  • Wireless Pressure
  • Wireless Rotary Motion
  • Wireless Temperature
  • Wireless Voltage
  • Wireless Weather

System Requirements

  • Operating Systems: Windows, Mac, Linux (Raspberry Pi)
  • Bluetooth 4.0+
  • Python version 3.7-3.10
  • IDE of your choice (VSCode, PyCharm, etc)

Example Projects

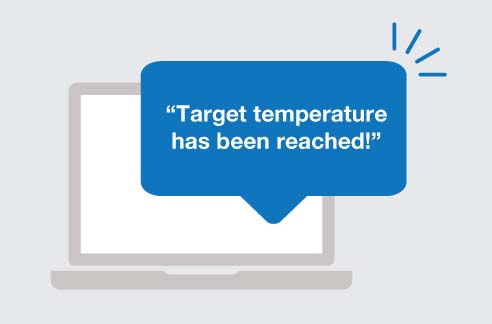
Temperature Alarm

Use a Python text to voice plugin to narrate temperatures out loud.

View Code on GitHub


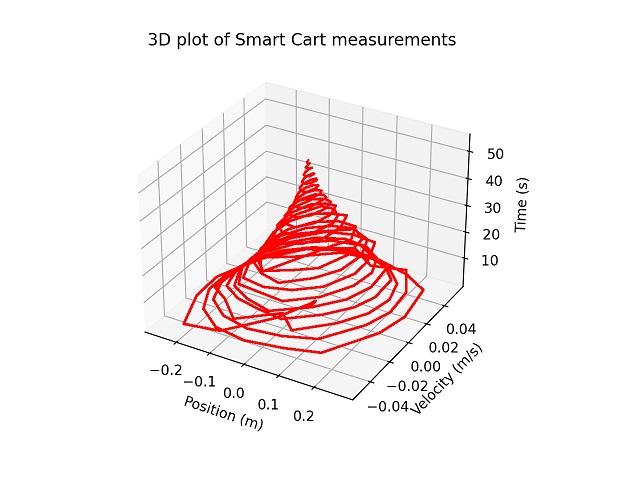
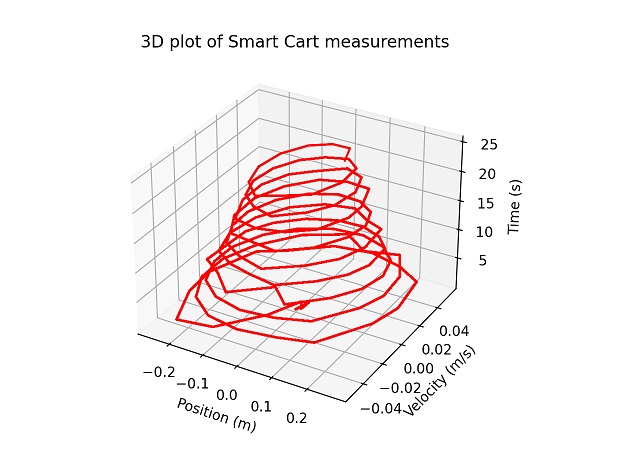
Smart Cart 3D Plot

Create an 3D plot using values from the Smart Cart.

The Beauty of Periodic Motion: A Capstone Observation Experiment

As a third-year Biomedical Engineering student at the University of Guelph, learning throughout this pandemic has been especially difficult, but why? It’s all the same materials. The same teaching style. I can even choose my learning environment and mitigate distractions.

For me, the biggest thing that has been missing throughout this pandemic has been experimentation, but more specifically, labs that push students to apply their knowledge to their own observations or to the world around them. During this pandemic, I took a course called Biomechanics as an extracurricular. Without a doubt in my mind, this course ignited my passion for practical application. Students were required to observe, collect, and write three different labs, all centered around the biomechanics of crutch walking. After learning to use a goniometer, force plate, EMG sensors, and 3D modelling software, students then created their own biomechanics experiment.

This is where the real learning begins.

What does this have anything to do with harmonics or even Capstone, you may ask? The point I am trying to make is that you can throw complicated laws and theorems a student’s way. However, they won’t understand it until they begin to connect these laws to the world around them. Every student has asked, “When will I ever use this?” but rarely do you ever find a student who seeks the question “How does this affect the world around me?” As such, I wanted to pose a simple question that pushes students to connect their knowledge outside the classroom.

What are some examples of harmonic motion in your daily life?

This question is really nothing special, but it can be easily observed and analyzed with little to no equipment. For this example, I used PASCO’s Capstone Software going frame by frame to analyze the motion of various objects and graphing the vertical position (meters) versus time (seconds).

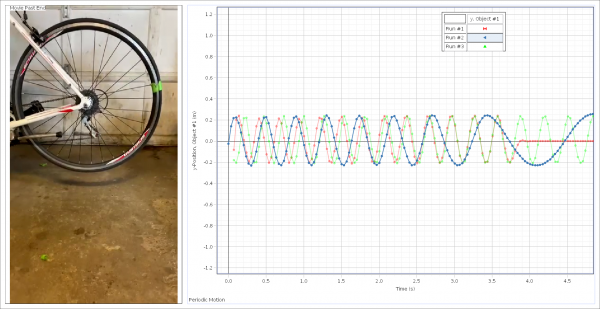
The first example of harmonic motion was the spinning of a bicycle wheel, which was suspended to have no contact with other objects. Three different examples of periodic rotation were observed using the Capstone software and a bright green piece of tape.

The green line represents a graph that has no brakes applied, the blue line represents a system with light braking pressure, and the red line represents a system with full braking.

From the data collected, it was observed that as the brake pressure is increased, the period of the oscillator decreased. This trend is essential for students to understand as it raises the question of braking distance and the effects of friction on a periodic oscillator.
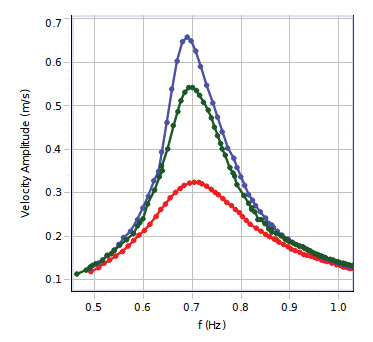
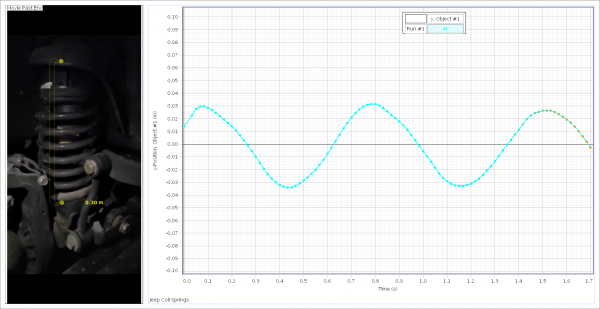
The next example of harmonic motion was car suspension. The system represents a driven harmonic oscillator as most car suspensions will be critically damped or have some sort of dampening. For this experiment, I highly recommend filming the oscillation in real-time with an additional light source. The top of the spring was tracked throughout the cycle and plotted on a vertical position vs. time graph.

The blue line represents the effect of the applied force on the vertical position (meters) of the spring vs. time (seconds).

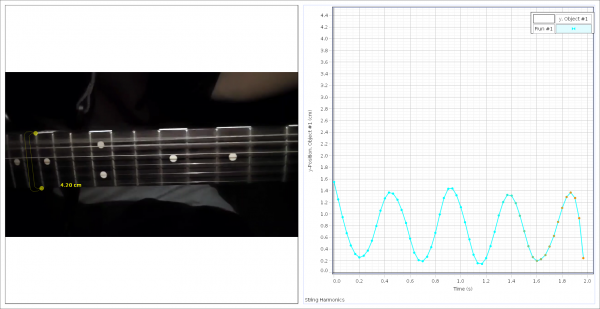
As a final example of harmonic motion, the E-String of a guitar was filmed using the slow-motion setting on a phone, shooting at about 960 fps. String harmonics are incredibly difficult to capture, and for a more accurate measurement, I highly recommend the use of a slow-motion camera. As an alternate example of harmonic motion, I recommend a swing, metronome, or any pendulum clock.

This graph represents the vertical position (centimeters) of the guitar string vs. time (s).

Laboratory experimentation is usually very equipment-heavy, which prevents students from observing the effects of the laws and theorems on a day-to-day basis. The difficulty of tracking time, position, or other factors removes focus from the real learning and can often times impede a student’s understanding. The best way to foster a student’s understanding is through their own curiosity.

Increase Student Engagement with Virtual SPARKvue Labs

One of the hardest things about teaching online during this pandemic has been ensuring student engagement.  When my physics class moved online, I knew I wanted to somehow continue the lab component but wasn’t quite sure how… until I learned about shared sessions in SPARKvue.

Without a doubt, remote labs were not going to be as hands-on as they were in person, but students should still have the opportunity to engage in the other practical applications of labs like making observations and analyzing data.  A shared session in SPARKvue allows students to see data being collected in real time as if they were doing experiments themselves.  I recently used this feature for a circuit lab in my Physics class.

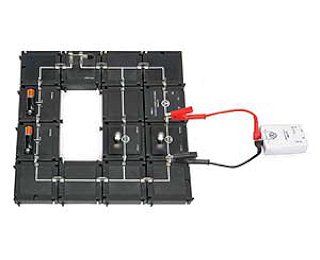
EM-3535 - Modular Circuits Basic

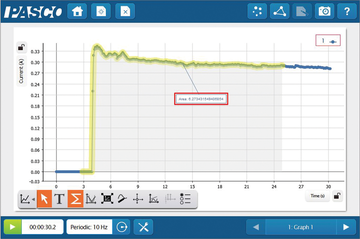
I set up a circuit using the modular circuits and pointed a webcam on it so the students could see the circuit I was building and manipulating.  I then started a shared session on SPARKvue and the students all joined in to see the voltage and current readings.  As I made changes to the circuits, I had students write various predictions in the chat of our meeting room.  The ability to predict and then see what actually happens in real time reflects what my students would do if they were engaging with this lab in person.

Doing this lab remotely not only allowed the students to predict, observe, and analyze; it actually opened up an avenue for more enriched discussions due to it’s collaborative nature and engaging the entire class at the same time.  When the data didn’t exactly match a prediction, I could point to aspects of the circuit through the webcam and connect what we were seeing to the data being shown.

The ability to predict, observe, and analyze is one of the key features of any science lab. By pairing a data collection program like SPARKvue with a webcam and the modular circuits kit (or other PASCO sensors), students can observe how data is being collected and engage in the process of scientific exploration of the concepts they would otherwise only see written on a page.  SPARKvue is changing not only the physical classroom but also the virtual classroom into a more engaging, thought-provoking, and dynamic environment for learning.

Resource

How to start a shared session in SPARKvue:

SPARKvue includes an easy & effective tool for hosting distance & hybrid labs!

Alternate text

With Shared Sessions, students can easily join a SPARKvue session hosted by their teacher – or even another student – from anywhere! They observe data collection in real time and keep a copy of the data to perform their own analysis.

Setting up a session is quick and easy and allows students to participate in a home lab using just their smartphone. Once the session is finished and students have completed their analysis, they can digitally submit their work using cloud services or the Journal Snapshot tool.

Save & Share Cart
Your Shopping Cart will be saved and you'll be given a link. You, or anyone with the link, can use it to retrieve your Cart at any time.
Back Save & Share Cart
Your Shopping Cart will be saved with Product pictures and information, and Cart Totals. Then send it to yourself, or a friend, with a link to retrieve it at any time.
Your cart email sent successfully :)